
How to Make Personalized Iron-On Labels

One thing that took me forever to figure out how to do easily was make my own shop labels. I looked into purchasing them, but didn't want to commit to one design or spend that much. I like changing my labels and having different designs for different items.
I have found that the way I use to make labels is pretty quick, pretty reliable and fairly simple to do.
I use my normal inkjet printer, and by paying attention to a few details, I have had no problems using it successfully.
The fabric I use changes - I usually use a solid white cotton or light color muslin.
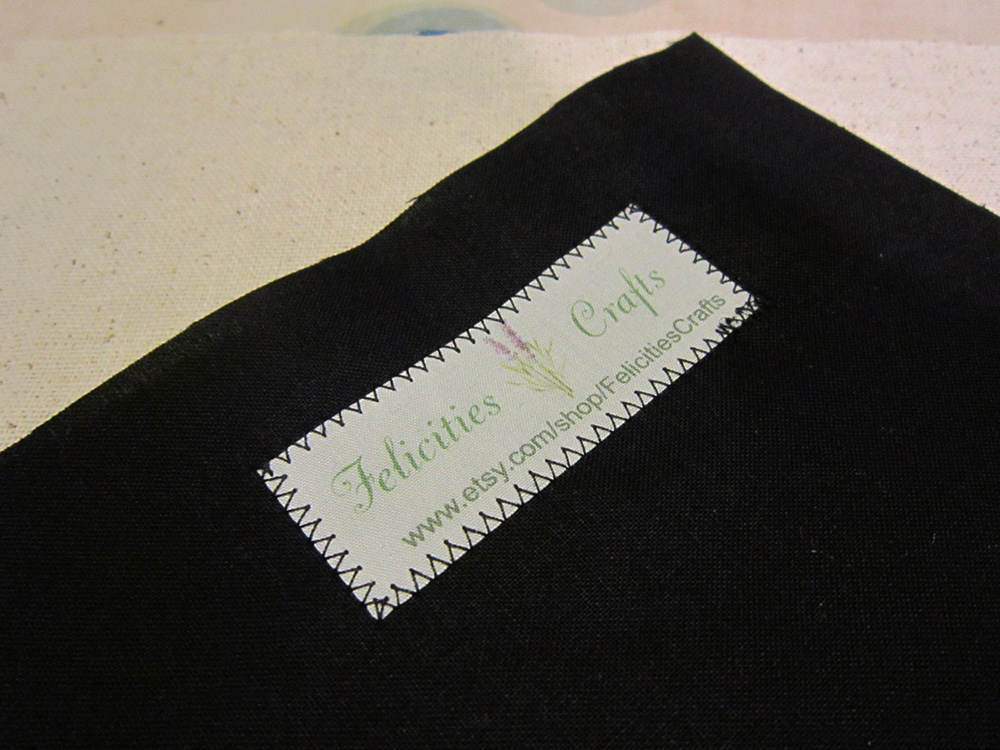
Also, these labels can be ironed onto whatever project you are working on. You
could leave it just like that, but I like to sew around the edges.
Supplies needed:
Computer
Inkjet Printer
Fabric
Pellon 805 Wonder Under
Iron
Cutting tools (rotary cutter and mat work best)
That's it - lets get started!
First, lets get our fabric ready for the printer:
Cut your fabric an inch bigger then normal printer paper to 9 1/2" x 12".
Cut the Wonder Under 1/2" bigger than printer paper: 9" x 11 1/2".
Center the Wonder under onto the fabric and iron on.
Tip: Iron this on really well - on both sides. Make sure there are no air bubbles and the edges are all really ironed and glued down to the fabric. Especially the edge that will lead into the printer! If this part isn't ironed well enough, it may jam in your printer.

Once that is done and ironed on really well, take it back to your cutting mat and trim this piece down to exactly 8 1/2" x 11". Make sure you trim it so the back is completely covered by the Wonder Under.
Take it back to the ironing board and make sure all the edges - especially the one leading into the printer - is very well pressed down.
Now for the labels:
I go online to Avery Templates and use one of the templates they have for address labels. This template is very easy to use and very easy to design. Take your time and come up with a design you like.
Here's the website: Avery Templates
Once there, I click on Avery Design and Print Online.
Here is the label template I use: #5160 - 1" x 2 5/8" labels (or you can choose whatever size label you would like)
I choose the blank label and design it myself, but there are a few options there for you to choose from.
Here are two pictures of my computer screen after designing my labels:


Once you have a design you like, save it and then click on Preview and Print. It will show you how it looks on the page with all 30 labels filled in. Choose "Print It yourself" and "Print Now" - it will remind you to uncheck "fit to page" on your printer options - click "Open" and it opens your labels and you can check your printer options.
I usually like to print my labels on paper first to make sure I like how they look printed. I check to make sure the print is easily readable and try to take into account the color of the fabric I'm using - so I look to make sure the colors will show up nicely.
If I'm happy with how the paper version prints, I then load my fabric into the printer.
Tip: which direction the fabric/wonder under will be placed will depend on your printer - if you are not sure, test which side should go up by marking a plain piece of paper on one side with "this side is up" and feed it into the printer with that side up. Test print anything onto it and see how it comes out - you should be able to see which way to place the Fabric/Wonder Under sheet into your printer by doing that.
After loading the fabric into the printer, return to the computer, make sure "fit to page" is unchecked and hit print again.
Here is my paper version of the labels on the left, and my printed fabric label sheet on the right. It came out nice!

Trimming Them Down:
Next we need to cut all these labels out. Depending on the size label you want, and how fussy you are (I like all my labels the same size) I trim the extra fabric off the sides and top first using my rotary cutter. These labels were meant to be 1" wide so it is fairly easy to line up the sheet on the mat.

After I have the edges trimmed, I cut the labels into three columns that are 2 5/8" wide.

And then trim those columns down to 1" labels:


I usually try to do all three at once and just cut straight across, but they do get rather shifty and I end up doing one column at a time anyway.
In the end, you should have 30 nice labels to use in whatever design you like!

Using Your Labels:
To use your labels just peel off the paper backing.
Tip: When I use Wonder Under on anything, I sometimes find it difficult to find the edge to peel the paper off easily. I take a pin and lightly score the paper by making a line to one edge - just a little one and carefully not to touch the fabric underneath. I can then peel from this scored edge rather easily.
Once the paper is off - iron the label onto whatever you like.
 |
| You can see where I needed a pin to score the paper backing at the edge |
 |
| Label ironed onto black cotton |

And that's it!

I hope I explained this well! This method does work for me very well. I hope it works for you too!


